Accessories
Fasteners
Fasteners
- # 12 x 3/4″ Stitch Screws
- # 14 x 1″ Woodgrips
- # 14 x 1 1/2″ Woodgrips
- # 12 x 1 1/4″ Self Driller
- SS Rivets
- # 12 x 3/4″ Stitch Screws
- # 14 x 1″ Woodgrips
- # 14 x 1 1/2″ Woodgrips
- #10 x 1″ Trusshead Screws
- #10 x 1” Lo Profile Screw
- #10 x 1.5” Lo Profile Screw
- # 12 x 1 1/4″ Self Driller
Standing Seam Accessories
Standing Seam Accessories
- 1 1/2″ Fixed Panel Clip
- 1 1/2″ Sliding Panel Clip
- 2″ Fixed Panel Clip
- 2′ Sliding Panel Clip
- Top Closures Various Widths
Crickets / Snow Diverters
Crickets / Snow Diverters
- Large Cricket 6/12 and high
- Small Cricket 5/12 and high
*Available in even pitches only
Sealants
Sealants
- Sealer Tape 200′ Roll
- Butyl Tape 45′ Roll
- Butyl Tube SM5430
- Flexible Seal 10 oz Tube
- Emseal 18′ Roll
Foam
Foam
CLOSED CELL FOAM
- Husky Top Closures 36″ Coverage
- Husky Bottom Closure 36″ Coverage
- NorStar Top Closures 36″ Coverage
- NorStar Bottom Closures 36″ Coverage
- EZSnap Top Closures 36″ Coverage
- High Rib Top Closure 36″ Coverage
- High Rib Bottom Closure 36″ Coverage
OPEN CELL FOAM
- 1″ Universal Foam Closure 25′ Roll
- 1 1/2″ Universal Foam Closure 25′ Roll
- 1 1/2” Flowvent 10’ roll
- 3/4” Flowvent 10’ roll
Pipe Flashing
Flashing
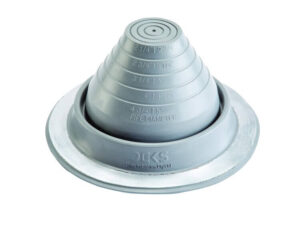
STANDARD PIPE FLASHING
- #2 Dektite 1 3/4″ – 3 1/4″
- #3 Dektite 1/4″ – 4″
- #4 Dektite 3″ – 6″
- #5 Dektite 4″ – 7″
- #6 Dektite 5″ – 9″
- #7 Dektite 6″ – 11″
- #8 Dektite 7″ – 13″
- #9 Dektite 10″ – 18″
HIGH TEMPERATURE PIPE FLASHING
- #3 Silicone 1/4″ – 4″
- #5 Silicone 4″ – 7″
- #8 Silicone 7″ – 13″
- #9 Silicone 10″ – 18″
ELECTRICAL FLASHING
- #801 Retrofit 3/4″ – 2 3/4″
- #802 Retrofit 2″ – 7 1/4″
- #803 Retrofit 3 1/4″ – 10″
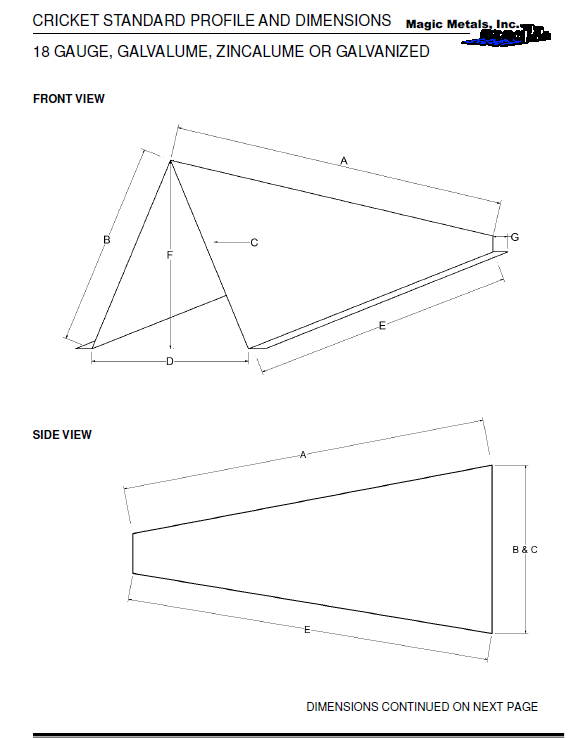
Cricket Standard Profile & Dimmentions
Color Chart
Colors shown for reference only. For true color representation please request a pre-painted metal sample.
Concealed Fastener & Commercial Panel Color Chart
Exposed Fastener Roofing & Wall Color Chart
Installation Guides
Installation Instruction & Guides for Storing Materials
Download Installation Guides
Download Installation Guides
Storage Guidelines
Storage Guidelines
IF YOU ARE NOT INSTALLING PANELS IMMEDIATELY, PLEASE, FOLLOW THESE GUIDELINES.
If water is permitted to enter the bundle, it is necessary to open the bundle, separate sheets and dry all surfaces.
- Prolonged storage of sheets in a bundle is not recommended, as galvanic corrosion may occur, causing the paint to bubble. If conditions do not permit immediate erection, extra care should be taken to protect sheets from white rust or water marks. It is recommended to store panels in a weathertight building.
- If panels cannot be stored in a dry area, store bundled sheets with one end slightly elevated and off the ground, to allow air circulation beneath bundle and to prevent rising water from entering the bundle.
- Prevent rain from entering the bundle by covering with tarpaulin, making provision for air circulation between draped edges of tarpaulin and the ground.
Warranty is void if panels are not erected within 6 months.
A Guide for Handling Our Product
A Guide for Handling Our Product
Always wear personal protective equipment when handling materials.
- Husky and NorStar panels average 2 lbs. per lineal foot.
- For easy handling with one man, panels can be rolled and clasped with bungie cord or duct tape, to move one at a time.
- If panels come rolled, from Magic Metals, Inc., put a loose “release” strap on each end of panels.First break the end bands and then, the middle band; otherwise, person(s) can be become injured or panels damaged.Lastly, remove the release strap.
- To prevent panels from becoming scratched, do not slide the metal while in bundles.It is recommended to lift the panels the bundle.
- Wearing gloves grip the panel on each side to prevent cuts; meanwhile, do not let the panel slide against the hand or body.
- For installation instructions, please, reference the installation guide listed above.
Flashing Details
Flashing Details
Helpful Hints
Always wear personal protective equipment when handling materials.
-
Pre-Drilling
Pre-drilling of fastener and stitch screw holes will greatly reduce application time, improve appearance, and provide for better side lap sealing. Stack panel of like lengths in piles of 10 sheets. Take care to not damage the ends. Drill holes with 1/8” drill bit. Screw spacing will be as follows:
- Panels will be installed opposite of prevailing wind
- Start field screws 3 inches from the edge
- Remaining field screws will be every 24 inches
- Stitch screws will be every 12 inches, in line with the field screws, directly in the top center, of every overlapping panel only. (This rib will become the trailing edge of the panel.)
-
Fastening
Fastening of roof panels to plywood sheeting is accomplished with #9 or #14 x 1” or 1-1/2” woodgrip screws with neoprene washers though the 1/8” pre-drilled holes in the panel. Do not squash the neoprene sealing washer. The washer should be in firm contact with the panel only. Over tightening may cause “canning effect” on panels as it is put in place.
-
Sealer Tape
Sealer Tape is recommended between all roof panel side laps and end laps. The sealer tape may be installed either, on the ground, as the panels are taken from the bundle, which is the simplest; or, on the roof as the panels are in place.
-
Stitching
Stitching of the panel side laps is accomplished with a ¾” stitch screw through the pre-drilled holes in the overlap rib using a screw gun with an adjustable clutch. The screw must be allowed to drill its own hole through the under lap rib. Do not force the drill. Forcing may cause the underlap rib to be pushed down, resulting in offset holes and misalignment, which prevents a positive seal.
-
Cutting To Length
If you need to cut a panel, it is suggested you use aviation snips, left cutting/red handled and right cutting/green handled or metal shears. Be sure to wear gloves, as well as eye and ear protection.
-
Cutting Holes
If holes need to be cut in the center of the panel, start the hole by striking a screwdriver through the panel with a hammer and make a slit enough to work your snips.
-
Pitch Requirements
A 3/12 pitch is the minimum pitch for a NorStar, Husky, EZ Snap or High Rib panel. If any panels are installed on a 3/12 pitch or less, it is recommended, Owens Corning WeatherLock is utilized as an underlayment on the entire roof.